(updated 8/14/2022)
If you store and manage your music library on your computer using iTunes, getting music to your iPhone/iPad/iPod is much less annoying if you use WiFi Sync. Assuming you have a decent WiFi network, WiFi syncing is much faster than it is over USB. And once you set up WiFi Sync, you never have to connect your iDevice to your computer to sync again. For that matter, if you have a newer iPhone with wireless charging and you use Bluetooth headphones, you never have to plug anything into your phone again! No more replacing worn out Lightning cables, no more replacing expensive iDevices because of Lightning port rot, no more searching for lost dongles…. Life is good!
Yes, when WiFi Sync works, it’s great. The problem is that WiFi Sync doesn’t work reliably. And unfortunately, Apple is more interested in locking you into their profitable online services by getting you to store everything in “the cloud” than they are in fixing WiFi Sync. Apple’s official Sync support page provides no help at all. But through trial and error, I’ve learned a few things that can help.
Here are a few basic principles (Note: I run iTunes on Windows. The principles are the same for Mac users, but the details may be different.):
- Make sure iTunes on your computer and iOS on your device are both up to date. (Earlier versions might require jumping through different hoops to get sync to work.)
- Make sure your device and your computer are both on the same local network.
- Make sure your device has a good WiFi connection. If you have a 5GHz connection available, use it (2.4GHz connections are often noisy and unreliable, especially in urban areas).
- Make sure your firewall allows access to “Bonjour Service”. In Windows 10, search for “Allow an App”, then make sure every “Bonjour Service” (there may be more than one) is checked and the box under Private or Public is also checked, depending on your home network type (checking both is less secure, but probably OK).
- DO NOT install iTunes for Windows from the Microsoft Store. Download the installer directly from Apple. The Microsoft Store version does not include Bonjour.
It may also help to:
- Make sure all devices involved have a fixed IP address. Bonjour seems to have trouble tracking devices when their address changes. The best way to do this (especially for portable devices like phones or laptops) is to set up a DHCP Reservation to assign a specific address to your device in DHCP on your router using the MAC address to identify the device.
- If your computer’s network adapter has a power saving mode, disable it so the adapter is on at all times.
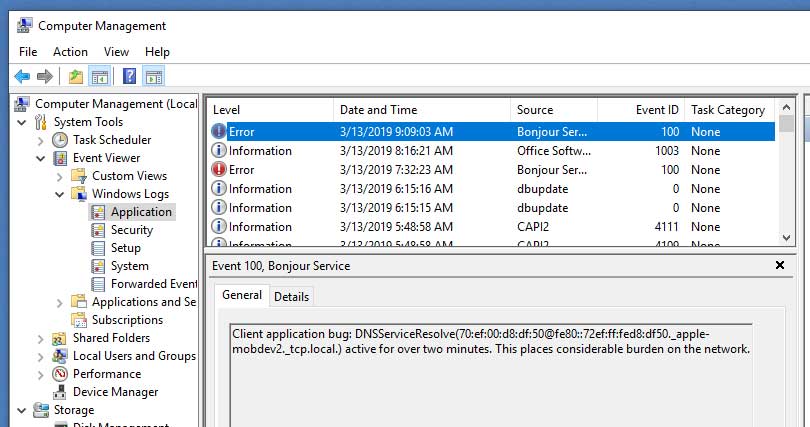
- Enable ipv6 support on your local network if possible. WiFi sync can work without ipv6, but I’ve found that iTunes is much more likely to find my devices with ipv6 turned on. This DNSServiceResolve error (see image below) appears much more often when ipv6 is not available.
You have to do the initial set up for WiFi Sync with iTunes using a USB cable. First, connect your iOS device to your computer with the cable, then open iTunes and click the device icon to select your device. (If your device doesn’t appear, Apple has some tips)
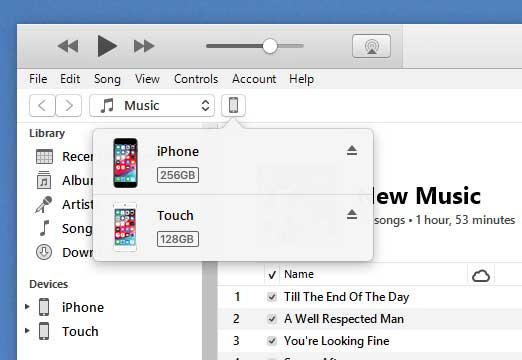
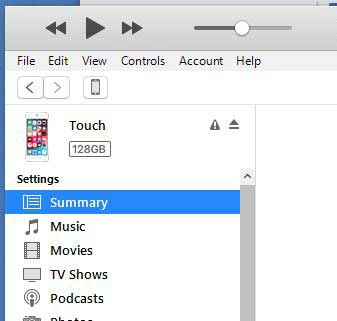
Then click Summary on the left side of the iTunes window, select the “Sync with this [device] over Wi-Fi” checkbox, and click “Apply”.
Afterward, the iOS device should appear in iTunes even if it’s not connected via cable as long as the computer and the iOS device are on the same local network. (If iTunes can’t see the device, you can’t sync.)
To start WiFi Sync, open iTunes on your computer, select your device from the device icon, select “Summary” on the left side of the iTunes window (if it’s not already highlighted), then click on the “Sync” button.
TIP: when you start WiFi Sync, iTunes scans your network to find the device using Bonjour. I’ve found that I can help this process along using the “iTunes Remote” app that you can get for free from Apple’s App Store. Before I start the sync, I unlock my phone, open the Remote app, make sure I’m connected to my iTunes library, and start a song playing.
Once you’ve started the sync, one of three things usually happens:
- Your device syncs successfully with iTunes. Hurrah!
- You get to step 2 of the sync process (“Copying diagnostic information”), then it stops. A triangular error alert appears. If you see the alert, restart iTunes, wait for your device to appear, and try again:
- iTunes searches for your device, but fails to find it and the device disappears from iTunes’ device list. If this occurs, restart iTunes, wait for your device to appear, and try again. If your device doesn’t appear, restart the Apple Mobile Device Service from the Services control panel or the Task Manager. Now your device will hopefully reappear, and you can try to sync again.
If you can’t exit from iTunes, or if iTunes won’t restart, open up Task Manager, select “More details”, select the “Processes” tab, find “iTunes” in the list of processes, right-click on “iTunes”, and select “End Task”. Now you should be able to restart iTunes and proceed normally. (Mac users can do something similar using “Activity Monitor”)
(Note: Apple’s documentation says, “The iOS device syncs automatically whenever it’s plugged in to power and iTunes is open on the computer.” I have NEVER seen this happen. I’ve always had to start WiFi Sync manually.)
If all else fails, try restarting your computer and your device, or go back to syncing via cable. But it’s been quite a while (knock on wood) since I’ve had to do that. I still have to jump through a few hoops regularly, but at least I can almost always get WiFi Sync to work.
What’s your experience with WiFi Sync? Did this post help? Let me know in the comments!
Contact me if you need help you with iTunes or any other computer issues!
the only thing tha worked the sync problem.. dont install from microsoft
Bonour installed from the Apple developper download page.
iTunes installed from the Microsoft store (version 12.11.0.26)
mDNS added in the firewall.
Restart iTunes -> iPhone found !
Thank you !